Viewing and editing your metafiles
Introduction
The primary token of exchange for graphical imagery in NCL and NCAR Graphics is the NCAR Computer Graphics Metafile (NCGM), which can be produced directly from running NCL scripts or NCAR Graphics programs. This document describes a suite of applications that may be used to display and manipulate NCGMs. Many of the applications described in this document may also ingest valid ANSI-standard Computer Graphics Metafiles (CGMs), provided they are transformed into NCGM format using the tools discussed later in this document.
The primary components covered in this section are:
- filters to convert CGM files to and from NCAR's privately encoded format
- ctrans---a translator for sequential frame display to your terminal or workstation window and for output to many hardcopy devices
- ictrans--- a text-based, interactive version of ctrans that may be used from any graphics terminal and the X11 windowing system
- idt--- a graphical user interface (GUI) to ictrans
- med--- a text-based, frame-level
interactive NCGM editor
---------------------------------------------------------------------------
 GUIs are supported by and require the X11 Window System. Text-based
 interfaces are typically equivalent in function to GUIs but only require
 a standard UNIX environment.
---------------------------------------------------------------------------
Environment
The examples in this document assume that you are using csh, the C shell. If you are using ksh, the Korn shell, or sh, the Bourne shell, you may want to get help from your system administrator. If you are not sure what shell you are using, check with your system administrator.This section discusses the environment variables that must be set. Many of the environment variables are invariant from one session to the next, so you may want to place them in your .login or .cshrc file. Your site administrator may have already preconfigured your environment for you. To determine which variables are already set, type:
printenv
Search path
You must make sure that the NCL and NCAR Graphics executables and the current working directory, ".", are on your search path. You must also make sure that the appropriate NCL and NCAR Graphics environment variables are set. Please see the NCL environment variables section for information on setting critical environment variables.
Metafile translators
When using NCL metafile translators you must either set the GRAPHCAP environment variable to reflect the graphics device you are using, or provide the device name as a command line argument. To determine which devices are supported, you can type:
gcapsThe general form for setting your graphcap is:
setenv GRAPHCAP device_nameAs an example, if you are running under X11 you would use:
setenv GRAPHCAP X11You may want to set this variable in your .login or .cshrc file so that it will always be available. The device_name may also be specified on the command line for the translators, thus overriding the environment variable.
X11 users
If you are an X user, you will also need to set the DISPLAY environment variable. For example, if both your X server and your translator will run on the same local machine then type:
setenv DISPLAY:0or possibly:
setenv DISPLAY unix:0Check with your system administrator if you are not sure.
If you are running remotely on a machine named pebbles and your local workstation where your X11 server is running is named bambam, then you need to set your DISPLAY environment variable on pebbles with:
setenv DISPLAY bambam:0and on bambam execute:
xhost + pebbles
Translator fonts
Finally, you may optionally want to specify a font other than the default to be used for subsequent metafile translation of text. The FONTCAP environment variable may be set:
This section provides several simple examples that demonstrate the
basic steps for using the metafile (NCGM) translator ctrans. We assume that your NCARG_ROOT
and possibly DISPLAY environment variables have been set correctly as
discussed above. Before you start you will need an NCGM. You can
create an NCGM by executing:
For most of the output devices supported by ctrans, the metafile translation process
results in a stream of device-specific commands being written to the
standard output. This command stream may be captured for subsequent
processing. For example, the command:
Sometimes it is desirable for the purposes of debugging to see what
CGM commands are actually contained in your metafile. The ctrans clear-text driver may be used to
convert your binary-encoded NCGM into a human-readable ASCII
representation. For example:
The command:
ctrans offers a suite of command
line options for controlling the translation process performed on a
metafile which may ultimately determine the appearance of your
plot.
ictrans, a text-based interactive
version of the metafile translator ctrans, will read commands from any
terminal. With ictrans, you are
no longer limited to sequential metafile access. Interactive
translation may be desirable if your metafile contains lots of
metafile frames or if you simply want to take advantage of some of the
functionality in ictrans that is
not available in ctrans. You
invoke ictrans by typing:
The command for viewing a metafile frame is plot (you can type
p for short). Typing plot at the ictrans> prompt will
cause the first frame in the metafile to be displayed. ictrans is case sensitive; typing
PLOT will not work. After the frame has been plotted, you can
press RETURN to signal ictrans to
re-enter command mode (you should see the ictrans>
prompt). Entering a second plot command will cause the next
frame, if any, to be displayed:
So far, we have only shown sequential metafile access. ictrans allows for random frame access
as well. To view the fifth frame in a file, type:
For convenience, several frames may be listed on a single command
line. To view the first through third, the fifth, and the last frame,
type:
ictrans allows you to save the
metafile describing a frame, or set of frames, to a file. If this file
already exists, the saved frames are appended at the end. If the file
does not exist, it will be created for you. To save the current frame
to a file named save.ncgm, type:
If
you type:
If the necessary hardware and software exist at your site, ictrans may have been configured to
translate metafile frames and send them to a printer. To determine
whether ictrans has been
configured for printing to a spooled device, type:
For more information about configuring ictrans for printing metafiles, see the
documents on ictrans and ncarv_spool.
The ictrans zoom command
allows you to zoom or pan any area of your plot. For example, the
following command will result in the bottom-left quarter of the
current frame being drawn so that it fills the entire graphics window:
It is sometimes desirable to access ictrans functionality in a
noninteractive, or batch, environment. For example, you may want be
able to send selected metafile frames to a printer from inside a shell
script. You might be able to use ctrans to accomplish this task, but
ctrans provides no flexible
mechanism for choosing which frames get sent; ctrans will send the entire file. As we
have seen, ictrans provides a
rich addressing model for selecting pieces of a metafile for
processing. To facilitate the use of ictrans in a batch mode, ictrans accepts all of its commands on
the UNIX command line by preceding them with a -e flag.
For example:
Yet another interactive metafile translator is idt. What makes idt different from ictrans is that idt has a point-and-click or graphical user
interface (GUI). It may only be used on a workstation (or X terminal)
supporting the X11 windowing system.
This section provides examples of using idt's more common features. For a complete
description of idt functionality, see
the idt man page.
Once again we assume that you have set your NCARG_ROOT and DISPLAY
environment variables correctly as discussed in the
"Environment" section. Furthermore, idt requires a device specification of
X11. One way to accomplish this is by setting your GRAPHCAP
environment variable to X11:
setenv GRAPHCAP X11
A note on entering text: In many of the examples that follow, you will
be asked to enter text into a "text widget" that appears on
your screen as part of the application. To enter text into a text
widget, you must move the mouse sprite so that it is completely inside
the surrounding text widget box. Depending on your system's
configuration, the sprite should change appearances to confirm its
position within the text widget. The Athena Text widget provides many
keyboard editing commands. These commands allow you to edit the
buffer. The default key bindings are patterned after those in the
emacs editor. For example, typing CONTROL-k will delete from the
cursor to the end of the line, and DELETE key will delete the previous
character. If you are familiar with the emacs editor, you should have
no trouble entering text into NCAR Graphics GUIs. If you are not
familiar with emacs, you may have to experiment a little to get the
hang of it.
You are now ready to examine a metafile on your X11 workstation or X11
terminal. See the preceding section "Getting
started---Translating metafiles with ctrans" for
instructions on creating a metafile. The following examples assume you
have already created a metafile and its name is bnchmk.ncgm. We
also assume that you have not modified any of the X11 resources that
describe the appearance of idt.
Invoke idt by typing:
The control panel (Figure 1) provides a simple mechanism for managing
displays (Figure 2). A display represents a metafile, a drawing
canvas, and a set of functions for determining how the metafile is
plotted on the drawing canvas. The control panel simply allows you to
create and destroy displays. Before you can "create" a
display, you need to "select" a metafile. A metafile can be
selected either by using the <select file> button on the control
panel or by placing its name on the command line. Invoking idt with a metafile name as a command line
argument not only "selects" the metafile but also
"creates" the display.
On most systems, the name of the metafile appears in the title bar at
the top of the display. The first row in the display contains a scroll
bar for randomly selecting a frame to be translated. The label bar to
the right displays the number of the frame to which you have
scrolled. The display is intended to resemble a video tape
recorder. Thus, the second row contains <playback>,
<jogback>, <stop>, <jog>, and <play> buttons,
respectively. The third and fourth rows contain more complex display
commands. See Figure 2.
There are two ways to randomly access frames in your metafile: the
first is by using the scrollbar in the upper left corner of the
display panel. The second is by using the <goto> button in the
third row. When you select <goto>, a small popup dialog box
appears and prompts you for the number of the frame to display. If you
enter 2 and then select <ok> from the <goto> popup, the
second frame in the metafile will be displayed.
It is sometimes convenient, particularly with large NCGMs, to work
with only a subset of the frames contained in the file. The <start
segment> and <stop segment> buttons allow you to define such
a subset, called a segment. Initially, the defined segment is the
entire file. The <start segment> and <stop segment>
buttons allow you to redefine the starting and ending frame
boundaries, respectively, of the current segment. Subsequent idt commands will treat the metafile as if
it only contained the frames defined by the current segment. For
example, if you select the <play> button after setting <stop
segment> to 4, playing will halt after the fourth frame in the file
is displayed.
The <save> button allows you to write the metafile
describing the current frame to a file. This file can translated at a
later time. When you select <save>, a dialog popup appears
asking you for the name of the file to save to. Enter the name of the
file and select <ok>. If the file already exists and it is a
valid NCAR CGM, the current frame will be appended to this file. If
the file exists and it is not an NCAR CGM, it will be overwritten. If
the file does not exist, it will be created.
The <zoom> button is used for zooming and panning an area
displayed in the drawing canvas. For example, suppose you want the
upper left corner of the currently displayed plot to be blown up to
fill the entire drawing canvas. Select <zoom> from the display
panel. The mouse sprite should change its shape, signaling to you that
you are in zoom mode. Move the sprite to the center of the drawing
canvas. Click and hold any of the mouse buttons. Move the sprite to
the upper left corner of the viewing window and release the mouse
button. The rectangular area described by the sprite motions will be
redrawn to fill the entire viewing window. To unzoom your plot, select
the <unzoom> button from the fourth row of the display panel.
One of idt's most useful features is
its ability to perform animation on the desktop. Before we discuss how
to use this powerful tool, it may help to briefly explain the hows and
whys of desktop animation.
You may have already noticed when experimenting with the <play>
and <playback> buttons that no matter how fast your X server is,
the ensuing sequence of images displayed to your screen does not make
a very acceptable animation: To your eye it appears as though images
flicker and fail to proceed along in a smooth, animated motion. This
is due to an anomaly known as "temporal aliasing." Temporal
aliasing results partially from the fact that whatever is drawn on the
drawing canvas (lines, filled areas, etc.) is immediately
visible. Another factor is the speed at which objects are drawn. As
the complexity of an image increases, so does the drawing time.
One way to help alleviate temporal aliasing is to postpone the display
of an image until it is completely drawn. This is how the animate
function works in idt; images (or
frames) are predrawn into an area of memory managed by the X
server. When it is time to display each frame in an animation
sequence, the entire frame can be posted to the drawing canvas
instantly. The rate at which successive images can be posted in this
manner is not affected by the complexity of the image, but rather on
its spatial resolution (width and height in pixels). If the images are
small enough in terms spatial resolution, the X server will be able to
display them rapidly and at a constant rate to produce a smooth,
flicker-free animation.
There is one drawback to this approach, however: the amount of RAM
(random access memory) required to store each predrawn image. RAM is a
limited resource on any workstation or X terminal. Be aware that it is
the X server memory that is of concern here. X servers run on the
workstation that is physically attached to your graphics display.
On most systems, the amount of memory required by an animation
sequence can be computed by multiplying the number of pixels in the
drawing canvas by the number of frames in the sequence. For example,
if your drawing canvas is 512 by 512 pixels and you have 10 frames,
then the total memory required is about 512 * 512 * 10 = 2,621,440
bytes. The amount of memory that is actually available to your X
server will vary depending on how much physical memory is installed on
your machine and what other processes are currently running. So how do
you determine how "big" an animation you can run?
Experimentation is probably the best method. Start with something
small, just a few frames, then move up. If the animation gets too big,
there will be a noticeable degradation in performance.
One final word of caution: UNIX processes typically do not free up
dynamically allocated memory for other processes to use until they
exit. Using idt to animate imagery
may cause your X server to grow substantially. On some systems, this
is a trivial issue because each console login session starts a new X
server. On other systems, it may be necessary to restart your server
manually if it grows too big. Check with your system
administrator. Your system administrator should also be able to tell
you how to monitor the size of your X server.
Below are the steps, and some guidelines, for successfully animating a
sequence of metafile imagery.
The first step is to determine how many and which frames you want to
animate from your file. As discussed, it's likely that it will not be
possible to animate your entire file at once. Fortunately, idt provides a convenient mechanism for
selecting only a portion of your image file: segments (see the section
on idt segments). When you enter
animate mode, only the currently defined segment is preprocessed and
loaded into server memory. By default, the current segment is the
entire metafile, so you may need to define a new segment. Defining a
new segment is a simple process and was discussed earlier in the
"idt segments" section. We'll assume we are still
working with the bnchmk.ncgm file, which only contains six
frames. For this example, we will animate the entire file. You may
want to check the value of the <start segment> and <stop
segment> to verify that the current segment is indeed the entire
file.
The next step is to select the <animate> button. idt will begin processing the frames in the
segment and loading them into server memory. For our example, this
should only take a few seconds. For a really large segment, this
process might take several minutes (Note: the total
preprocessing time also depends on the size of the drawing
canvas.). The text window in the control panel will keep you informed
of idt's progress.
When the preprocessing is complete, the text window in the control
panel will display the message "Done loading x
images," where x is the number of frames in your
segment. Now you can start your animation. The animation is controlled
the same way that the display of normal metafile imagery is
controlled. Selecting the <play> button will "play"
your animation in the forward direction. The <playback> button
will cause your animation to play backward. If <loop> is turned
on, the animation will loop repeatedly until the <stop> button
is selected.
One animation feature that is only available in animation
mode is the <delay> button. If your animation is moving too
fast, you can slow it down by setting a delay time, in 1/100's of a
second. By default, the delay time is 0.
To terminate your animation and go back to normal metafile processing,
select the <animate> button a second time.
When you are done viewing a particular metafile, you can terminate the
display session by selecting the <done> button. Terminating a
display session does not terminate the entire application. To exit
idt, you may select <quit> from
the main control panel at any time.
Once idt is up and running, you may
want to take advantage of idt's file
browser for selecting metafiles for translation. idt has a built-in file finder that you can
access by selecting the <select file> button from the control
panel. Selecting this button at any time causes a popup menu labeled
"file finder" to appear. The names of the files in your
current working directory should be listed in the text box in the
middle of this file selector. If you created the bnchmk.ncgm
metafile earlier, you should see it listed somewhere in this box. You
may need to use the scrollbar to bring it into view. When you have
found it, select bnchmk.ncgm with the mouse. The string
bnchmk.ncgm should appear in the box labeled
"selection," indicating that bnchmk.ncgm is the
current selection.
The uppermost box of the popup file selector contains a text widget
with an asterisk (*) displayed. The asterisk is the metacharacter used
in both the Bourne shell and the C shell for matching zero or more
characters in a filename. Hence all the files in the current directory
are displayed in the middle box. You can change the mask for the file
finder by simply editing the file finder text widget and selecting
<finder>. For example, if you enter:
When the desired filename is displayed in the selection box, you may
confirm your choice by selecting <ok>. You have now informed
idt of the name of the next metafile
to process. idt will pop up a new
display panel with which to plot the new metafile.
The med program is a frame-level metafile editor similar in
style and syntax to ed, the UNIX line editor. med allows
you to interactively modify metafiles at the frame level. It is
important to understand that the smallest atomic object that
med can work with is a frame. med does not allow you to
change the appearance of individual frames, except when you composite
frames on top of each other.
All of med's editing functions are performed in a temporary
buffer. This greatly improves the speed with which med can
perform its actions. Changes made in the buffer have no effect on the
original file until the buffer is written to disk with the
write command. If you terminate a med session without
saving the buffer, all changes will be lost.
Under normal invocation, med will enter command mode and
display the prompt med>. The prompt is a signal that med is
ready to accept commands from the user. The basic format of a
med command is:
Assuming you have an NCAR CGM named bnchmk.ncgm, invoke
med with the command:
To list the contents of the buffer at any time, use the print
command. The print command will report a frame's offset, that
is, its relative position in the file, the number of 1440-byte records
contained in the frame, the offset of the first record of the frame in
the file, and an optional description of the frame if it exists. To
list the entire contents of the buffer containing the bnchmk.ncgm
metafile type:
To write the first three frames in bnchmk.ncgm to a file called
test.ncgm, type:
To append a frame to an existing file, use the append
command. If you use the write command as in the previous
example, the file will be overwritten and will only contain the sixth
bnchmk.ncgm frame. To append the sixth frame of
bnchmk.ncgm to the end of the file test.ncgm, type:
To read the contents of another NCGM into the current buffer without
destroying the buffer contents, use the read command:
Suppose you have a single NCGM that contains a large number of
frames. Since large NCGMs can be quite unwieldy, it is often more
convenient to have several smaller files than one huge one. The split
command can be used to divide a single file into an ordered sequence
of smaller ones. For example, suppose you were editing a large
metafile with 1,000 frames in it. You could use the command:
The number of split files created does not have to be an integral
divisor of the total number of frames. med will do its best to
keep the same number of frames in each split file.
To duplicate a set of frames and place them somewhere else in the
metafile, use the copy command. The general format of the
copy command is:
To remove some frames from the buffer, use the delete
command. To delete the last two frames in the buffer:
The move command can be used to change the relative position of
frames in a metafile. Like the copy command, the general format
of the move command is:
The med utility can do a limited amount of compositing with the
merge command. merge will append the drawing
instructions of one frame to the end of another frame. When plotted,
the resulting image appears as if one frame were composited on top of
another. The command:
The edit command causes the entire contents of the buffer to be
erased and replaced with a new metafile. The command:
The edit command has a safeguard to prevent you from
accidentally destroying changes made to a buffer that have not been
saved. If unsaved changes exist, the edit command will fail and
print a warning message. To prevent this, save the file before
executing edit:
The help command, without any arguments, provides a list of all
available commands and a brief synopsis of what each command does. It
will also give you the appropriate syntax for a particular
command. For example, if you type:
Like ictrans, med offers a batch or command line processing
capability that is sometimes preferable to the interactive
approach.
Like ictrans, med performs commands from the command line using
the -e option.
For example, when issued from the command line, the command:
The command:
NCL and NCAR Graphics provide utilities to facilitate interoperability
with other software. In essence, these tools may provide a bridge
between NCL/NCAR Graphics and some of the more ubiquitous software
packages that may be available at your site. This section identifies
these tools and takes a brief look at how they are commonly used.
CGMs that were not created by NCL or NCAR Graphics are not suitable
for processing by NCL/NCAR Graphics applications. NCGMs contain
information not present in vanilla CGMs; this information helps to
speed up the parsing of the file. This parsing information must be
added to "vanilla" CGMs before they can be processed by
NCL and NCAR Graphics applications. The command:
Similarly, NCGMs cannot be parsed by non-NCAR Graphics
applications. To convert the NCGM ncar.ncgm to the vanilla CGM
vanilla.cgm, use:
Many commercial and public-domain scientific visualization packages
accept raster imagery as an input source. The primary image format
used by NCAR Graphics is the NCGM. However, you may use ctrans to convert your NCGM into a
number of different raster image formats. The general way to make such
a conversion is:
The command:
For example:
specifies that the cursive font, font10, be used.Getting started --- Translating metafiles with ctrans
which will leave the file bnchmk.ncgm in your current working
directory. Viewing your NCGM
Below are the steps for sequentially displaying the contents of an
NCGM on three different devices. Use the command(s) appropriate for
your workstation. From a Televideo vt100 graphics terminal:
or:
On a workstation running the X Window System:
or:
In all three cases, the first of six frames should appear on your
screen. You can sequentially advance through the NCGM by pressing the
RETURN key after each frame is plotted. In a window-based environment,
such as X11, make sure that the mouse sprite is in the graphics window
created by ctrans. Also, in a
window-based environment, clicking the left mouse button has the same
effect as pressing RETURN. You can terminate processing at any time by
sending ctrans an interrupt signal
(typing CONTROL-c on most systems). Printing your NCGM
translates the entire bnchmk.ncgm metafile into PostScript and
writes it to the file bnchmk.ps. When the standard output of
ctrans is redirected to a file (or
a pipe) in this manner, it is not necessary to press the RETURN key
between frames. ctrans will process all the frames in the file
and then exit without waiting for any user interaction. The file
bnchmk.ps may now be sent to a PostScript printer for printing,
possibly with the command:
ctrans can also generate output
suitable for printing on HP LaserJet printers that do not support
PostScript:
------------------------------------------------------------------------
 The lpr command used above is simply an example. Printing commands
 vary widely from site to site. Your system administrator should be able
 to provide you with the printing command appropriate for your site.
------------------------------------------------------------------------
For a complete list of supported output devices, execute the
gcaps command.Examining the contents of your NCGM
converts bnchmk.ncgm into clear text and sends the output to
the UNIX pager, more.
counts the number of CGM polyline elements that appear in the file
bnchmk.ncgm.
------------------------------------------------------------------------
 The ANSI CGM standard defines three encoding schemes for CGMs:
 binary, character, and clear text. The clear text produced by the
 ctrans -d CTXT option does not conform to the ANSI definition for clear
 text encoding and is not acceptable as input to other CGM clear-text
 interpreters. It is merely intended as a debugging aid for the user.
------------------------------------------------------------------------
Controlling NCGM translation
Interactive metafile translation
Interactive ctrans (ictrans)
where metafile_name is the path to a valid NCGM. As with ctrans, you need to specify the output
device you want to translate to either on the command line as in:
or with the GRAPHCAP variable:
Upon invocation, ictrans will
respond with an account of the number of frames contained in the
metafile followed by the ready prompt ictrans>. Be patient; many of
the functions in ictrans require
information embedded in the metafile. The time required to extract
this information depends on the size of the NCGM.
ictrans> p
Note to X users: When ictrans is
displaying to an X window, you may find it convenient to operate in
movie mode. When ictrans is in
movie mode, a RETURN is not necessary to put ictrans into command mode after
plotting a frame from your metafile. Enter movie mode by typing:
ictrans> movie 0
You can abbreviate the command plot by typing p; all
ictrans commands may be
abbreviated up to the point that they are unique. For a complete list
of ictrans commands type:
ictrans> help
or just:
ictrans> h
Random access
ictrans> 5p
Relative addressing is also possible. To view the last frame in a file type:
ictrans> $p
Here, the $ is an alias for the last frame in the metafile.
ictrans> 1,3 5 $p
After processing each frame, ictrans waits for you to press RETURN
before proceeding with the next frame. You can read the man
page for ictrans by typing:
ictrans> ! man ictrans
(Typing ! returns you to the UNIX shell for one command.)Saving a metafile
ictrans> save save.ncgm
The current frame is the last frame plotted. (If no frames have been
plotted the current frame is the first frame in the metafile.)
ictrans> s save.ncgm
ictrans will tell you that the
command is ambiguous because the s command could stand for
either save or spooler. You can, however, abbreviate
save with sa. The save command uses identical
syntax to the plot command for addressing frames (as do all ictrans commands). To save the third
through last frame to the file foo.ncgm , type:
ictrans> 3,$s foo.ncgm
The newly created file, foo.ncgm, may now be translated just
like any other NCGM. If you type:
ictrans> file foo.ncgm
foo.ncgm will be read into the translator for processing. The
file command is used to change the current file being
processed.Printing metafiles
ictrans> spooler
If ictrans responds with anything
other than "" (null), then there exists at least one device
to which ictrans can send
translated code. The current printing device name is given by the
spooler command when spooler is executed without any
arguments as above. (The ictrans
command alias, without any arguments, lists all available
printing devices, if any.) For example, if spooler responds
with a device named "postscript," then to send the first
three frames of your file to this device after translation, type:
ictrans> 1,3Print
Don't forget to capitalize the P in Print. The P
is capitalized so Print can be abbreviated and not conflict
with p for plot.Zooming in on your plot
ictrans> ;zoom .0 .0 .5 .5
The two pairs of numbers, (.0, .0) and (.5, .5), specify the lower
left and upper right coordinates, respectively, of the frame to be
viewed. The new coordinate specification remains in place until
changed with a subsequent zoom command. To restore normal
viewing type:
ictrans> zoom .0 .0 1. 1.
Batch processing
ictrans -e 'spooler postscript' -e '$ Print' bnchmk.ncgm
would translate the last frame (the $ frame) in the metafile,
presumably into PostScript, and send it to the spooled device named
"postscript". Don't forget to enclose all -e options
in single quotes or the shell will mistakenly interpret special
characters, like $, for you.Interactive display tool --- idt
Translating metafiles (idt)
idt bnchmk.ncgm
Two windows should appear on your screen. The position and dimensions
of these windows may be adjusted with the mouse after it appears, or
it may be pre-set through your X resource file. The details for
manipulating window geometry after the window appears depend on the
window manager you are running. See your system administrator, or
consult the document "The X Window System at NCAR," which
offers some guidelines for customizing your X11 environment.The idt control panel
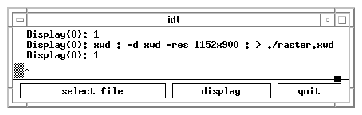
Figure
1.
The display panel
Figure
2.
If you select the <jog> button (the fourth button from the left
on the second row), the first frame in the file should be
displayed. Selecting this button a second time will cause the second
frame to be displayed, and so forth. You can go backward through the
file one frame at a time by selecting the <jogback> button, the
second button from the left on the second row. The buttons on either
end of the second row are for continuous playing in either the reverse
or forward directions, respectively. The <stop> button in the
middle halts either <play> or <playback>.idt segments <start segment> <stop segment>
Continuous playing <loop>
The <loop> button toggles the continuous play mode of idt on and off for subsequent
"plays" When idt is in
continuous play mode, the currently defined segment is treated as if
it were circular. There is no longer a beginning and ending frame in
the segment. Selecting <play> (or <playback>) will cause
idt to display all the frames in the
current segment, and then return to the first (or last) frame and
start over. Playing will not stop until aborted by selecting the
<stop> button.Printing frames <print>
Your site may have facilities for printing translated metafiles. idt may provide an interface to these
devices, depending on how the application has been
configured. Selecting the <print> button will present you with a
menu of the known printing devices for which idt has been configured. If you select
<print> and a menu appears, you may select a printer by dragging
the mouse sprite down to the desired menu item and releasing the mouse
button. Selecting a printer sends the current frame to that
device. New printers may be added dynamically to idt. Consult the man page on ncarv_spool for details.Saving metafiles <save>
Enlarging a plot <zoom>
Desktop animation <animate>
Terminating a plotting session <done>
The idt file browser
*.ncgm
and select <finder> or press RETURN, all of the files in the
current directory with the ".ncgm" name extension will be
displayed. Or, if you enter:
/u1/joe/*
all of the files in the user directory /u1/joe will be
displayed. Metafile editing
The med program
[address]command
where address is an optional field listing a range of
frames on which to perform the named command. Frames are numbered
starting with 1. A comma-separated pair of numbers specifies an
inclusive range of frames on which to operate. If no address is given,
the current frame is assumed as default. As with ictrans, med
commands may be abbreviated up to the point that they are unique. A
complete description of addressing syntax is given in the man
page for med.
med bnchmk.ncgm
med will respond with the number of frames in the file. The
current frame is set to the last frame in the file. (Note that this is
different from ictrans, which uses the first frame in the file
as the default current frame). If bnchmk.ncgm was created with
the ncargex utility described earlier, med should report
the existence of six frames.Listing buffer contents (print)
med> 1,6print
A listing for each of the six frames will appear.Writing frames to a file (write)
med> 1,3write test.ncgm
The first three frames in bnchmk.ncgm will be written to
test.ncgm. If the file already exists, it is overwritten.Appending frames to a file (append)
med> 6 append test.ncgm
The file test.ncgm now contains the first through third and the
sixth frame from the file bnchmk.ncgm.Reading a file into the buffer (read)
med> read test.ncgm
This will read all of the frames contained in the file
test.ncgm and append them after the current frame. med
will report the number of frames read successfully. A destination
other than the current frame offset may be specified as the target for
the incoming frames. The command:
med> 1 read test.ncgm
will append the contents of the file test.ncgm after the first
frame in the buffer. The first frame in test.ncgm will become
the second frame in the buffer.Splitting a large metafile (split)
med> 1,$ split 10
to create a sequence of files named med001 through
med010, each containing one hundred frames. med001 would
contain the first hundred frames from the original file, med002
would contain the second hundred frames, and so forth. Copying frames (copy)
[source_frames] copy [destination]
where source_frames is a list of frames to copy and
destination is the destination frame of the copy. The
frames copied are appended after destination. For example, to make a
copy of the first two frames and place them at the end of the file,
use:
med> 1,2 copy $
In this example, the $ is an alias for the last frame in a file. This
is helpful if you do not know how many frames are contained in the
NCGM.Deleting frames (delete)
med> $-1,$ delete
The $-1 denotes the offset of the last frame minus 1, that is, the
second from last frame. The second $ denotes the last frame, so $-1,$
denotes the last two frames in the buffer. Moving frames (move)
[source_frames] move [destination]
To move the first frame to the end of the file, making the second
frame the first frame and the original first frame the last frame,
type:
med> 1 move $
Compositing frames (merge)
med> 1,2 merge
appends the drawing instructions contained in frame 2 to frame 1. This
changes frame 1, and frame 2 is unaltered.
--------------------------------------------------------------------
 This command may produce unexpected results depending on how
 color and GKS point, line, and text attributes are specified in the
 metafile.

--------------------------------------------------------------------
Editing a new file (edit)
med> edit test.ncgm
will read the file test.ncgm into the buffer.
med> w
or append a ! to the edit command. This tells
edit to disregard any unsaved changes:
med> edit ! test.ncgm
Obtaining help (help)
med> help delete
med will describe the syntax for the delete command. Batch processing
med -e '1,$ split 3 bnch' bnchmk.ncgm
would split the file bnchmk.ncgm into three smaller files:
bnch001.ncgm, bnch002.ncgm, and bnch003.ncgm.
med -e 'r bnch001.ncgm' -e 'r bnch002.ncgm' -e 'r bnch003.ncgm' -e 'w all.ncgm'
would concatenate the bnch* files into a single metafile,
all.ncgm. The all.ncgm file should be identical to the
original bnchmk.ncgm. Interoperability with other tools
Non-NCAR Computer Graphics Metafiles
cgm2ncgm < vanilla.cgm > ncar.ncgm
will read in a vanilla CGM named vanilla.cgm and produce
an NCAR CGM named ncar.ncgm.
ncgm2cgm < ncar.ncgm > vanilla.cgm
----------------------------------------------------------------------
 A converted CGM may not produce entirely correct results when
 translated. NCAR Graphics translators operate on a subset of elements
 of the CGM standard (as do many CGM translators) and thus may
 encounter valid CGM elements that they do not know how to translate.
 Similarly, NCGMs converted to vanilla CGMs are not guaranteed to be
 correctly translated or even parsed by third-party translators.
----------------------------------------------------------------------
Rasterizing NCGMs
ctrans -d format -res resolution metafile > raster_file
For example, the command:
ctrans -d hdf -res 512x512 myfile.ncgm > myfile.hdf
converts the NCGM myfile.ncgm into an HDF raster file,
myfile.hdf, with a 512x512 pixel resolution. HDF files are
accepted by the NCSA application XImage.
ctrans -d avs -res 200x200 myfile.ncgm > myfile.avs
converts myfile.ncgm into a 200x200-pixel AVS file. The AVS
raster file format is suitable for ingestion by the Application
Visualization System. Finally, an SGI raster file may be created with
a command like:
ctrans -d sgi -res 200x200 myfile.ncgm > myfile.sgi
SGI raster files are understood by Silicon Graphics Inc.'s Explorer.