Installing NCL with "conda"
NCL can be installed on Mac and Linux systems via conda. Conda is a package management system that enables you to easily install software from the UNIX command line via the "conda" command:
conda install package_name
You must download and install conda first, either via miniconda or Anaconda. If disk space is an issue (Anaconda is quite large), we recommend miniconda as this is a more minimal system that requires less disk space.
Keep reading for information on how to install conda, and then how to use it to install NCL.
If you already have conda but haven't updated it in awhile, you might want update it by typing the following from a UNIX terminal window:
conda update -n root --all
Installing miniconda
If you don't already have conda installed on your system, then go to:
http://conda.pydata.org/miniconda.html
and select the appropriate 64-bit bash installer for whatever MacOSX or Linux system you have. (We do not have a pure Windows version of NCL.)
Follow the instructions for installing miniconda. When the installation is finished, you can test it quickly by typing the following from a UNIX terminal window:
conda -V
This should echo something like "conda 4.6.2".
Note: you can also get the conda command by downloading and installing Anaconda.
Create a conda environment and install NCL
We recommend that you install NCL under a conda environment, which will be called ncl_stable in the examples below. You can call it whatever you want.
From a UNIX terminal window in sh/bash mode, type:
  conda create -n ncl_stable -c conda-forge ncl
  source activate ncl_stable
You will need to run the "source activate ncl_stable" command every time you log out and log back in.
Installing a NCL 'development' version
Occasionally we provide a development version of NCL that provides bug fixes and/or new functionality that you can't get from the current version. We don't currently have an NCL development version available, but check back here later.
Test NCL
From a UNIX terminal window, type:
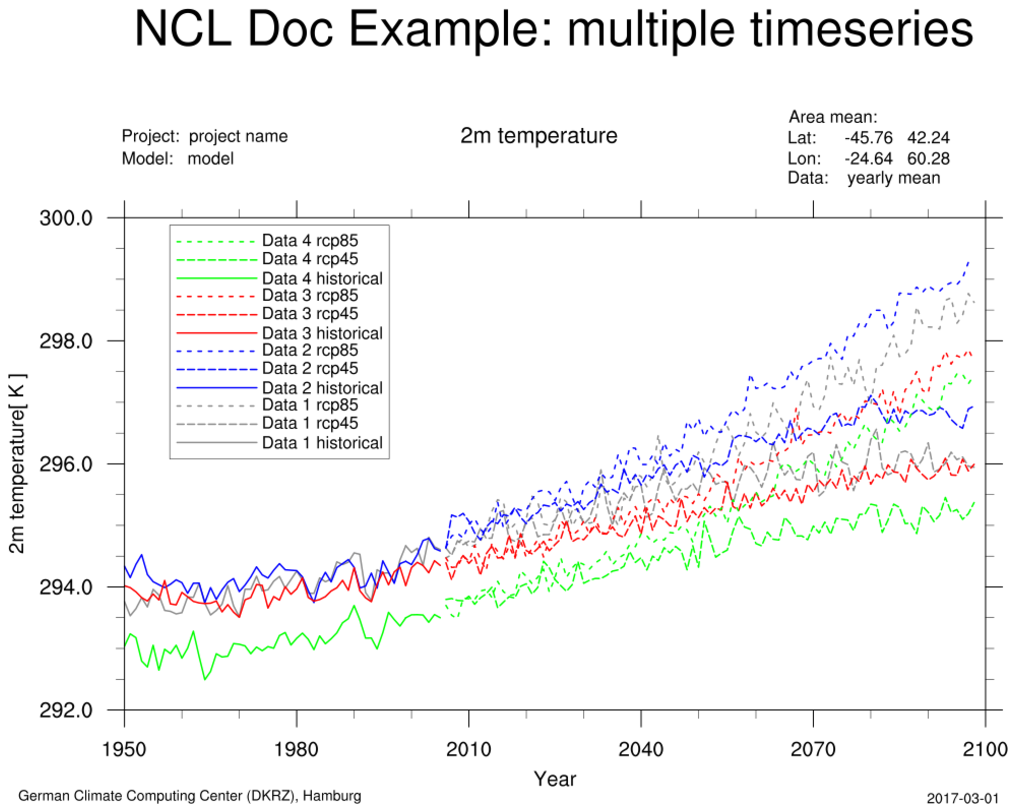
  ncl -V
  ncl $NCARG_ROOT/lib/ncarg/nclex/gsun/gsun02n.ncl
  ncl $NCARG_ROOT/lib/ncarg/nclex/nug/NUG_multi_timeseries.ncl
The first command should echo "6.6.2".
The second command should pop up an "x11" window with a simple line contour plot. Click on this window to advance to the next plot (there are five plots total). If the x11 windows don't come up, then something may be wrong with your DISPLAY environment variable. See the install from binary instruction page for details about setting DISPLAY.
The third command should produce a PNG file called "NUG_multi_timeseries.png" (click on image for larger view):
Troubleshooting
If NCL is not working after you installed conda, then you may want to force your NCL conda environment to recalculate all dependencies, which sometimes fixes the broken environment. Type the following from a UNIX terminal window, where ncl_stable should be replace with whatever your NCL conda environment is called:
conda update -n ncl_stable -c conda-forge --all
If you continue to have problems, then see the next section.
Send questions or problems to ncl-install email list
If you are having problems installing NCL using conda or NCL doesn't appear to be working, then subscribe to ncl-install and email your issue to ncl-install@ucar.edu.
Please include the exact error message and what you were typing that caused the error. Also include the output from typing the following commands from a UNIX terminal window:
    conda list -n ncl_stable
    conda --version
    which ncl
    ncl -V
    env  | grep NCARG